Work Orders in Mechanic's Mate
This chapter covers work order requests for facility maintenance.
Corrective Maintenance (CM) Work Orders
Preventive Maintenance (PM) Work Orders
Exporting PM Work Orders Due to Excel
Overview
Work orders are a request for facility maintenance. Mechanic's Mate has two types of work orders, Corrective and Preventive:
Corrective Maintenance (CM) work orders are created when a problem is reported and needs inspection or repair. For example, a pipe is leaking or a piece of equipment is making a strange noise. Many CM work orders require immediate attention.
Preventive Maintenance (PM) work orders are maintenance tasks that extend the life of the equipment when done at the appropriate intervals as, for example, keeping machinery properly lubricated.
The Work Order Process
The following steps outline the general work flow for creating and completing a work order using the Mechanic's Mate System:
Create the work order by entering the maintenance task information.
Print the work order.
Have the maintenance work performed on the equipment.
Complete the work order information.
Post the work order.
Details on how each step is actually completed are different for Corrective Maintenance (CM) and Preventive Maintenance (PM) work orders. See individual sections for more information.
Work Order Functions
The Mechanic's Mate functions used to create and process work orders can be found on two menus: the Work Orders menu and the Equipment menu.
The Equipment menu builds the files used by the work order functions to create and process the work orders. For example, it contains the Equipment Information function that maintains information about each piece of equipment. The Work Orders menu contains the functions used to create and process work order records.
The following is an example of the Work Orders menu. A description of each function follows the menu:
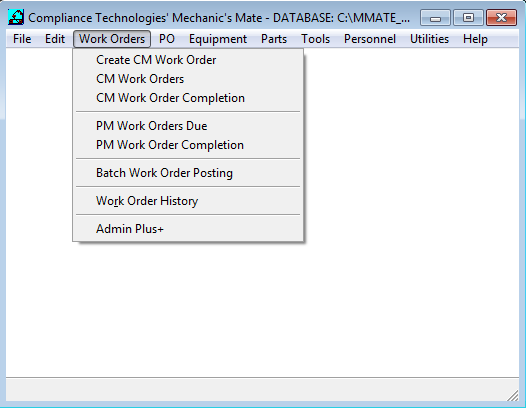
Create CM Work Order: This function creates corrective maintenance (CM) work order records. It is used to log the initial information about the maintenance request and print the work order.
CM Work Orders: This function is used to create, edit or delete corrective maintenance (CM) work order records.
CM Work Order Completion: This function is used to enter information about how the CM work order was completed, what resources were used, and what parts were needed. Once all information about the CM work order completion is entered, the work order is posted.
PM Work Orders Due: This function is used to select and print the preventive maintenance (PM) work orders to be completed. PM work orders are created using the PM Setup function (see the Equipment menu).
PM Work Order Completion: This function is used to enter information about how the PM work order was completed, what resources were used, and what parts were needed. Once all information about the work order completion is entered, the work order is posted.
Work Order History: This function is used to view or print information about work orders that have already been completed and posted.
Corrective Maintenance (CM) Work Orders
CM work orders are requests for corrective maintenance. A CM work order is created when there is a specific problem identified at the facility that needs the attention of a facility employee. There are three types of CM work orders:
Scheduled: Equipment needs to be inspected or repaired but it is not an emergency situation. Although this type of CM work order request can often be scheduled, it should not be confused with a preventive maintenance (PM) work order that can also be scheduled (see Preventive Maintenance Work Orders for more detail).
Unscheduled: Equipment needs immediate inspection or repair.
Safety: Situation represents a safety hazard to employees and needs immediate inspection and repair.
Safety work orders are automatically given top priority. You assign a priority to scheduled and unscheduled work orders.
The CM Work Order Process
The following steps outline the basic flow of the CM work order process. The actual processes within each step have more detail that may vary for each individual work order but all CM work orders will follow this general process:
Use the CM Work Order function to create a CM work order record.
Print the work order using the CM Work Order function. An identification number is assigned to the work order by the system.
The work order is given to the appropriate employee(s) for completion. They complete the work order.
Detailed information about who completed the work, how much time it took, what parts were used, and who was notified is added to the work order record using the CM Work Order Completion function.
Post the work order using the CM Work Order Completion function. The system marks the work order as being completed, removes it from the pending work orders list, and files it in the work order history files.
Editing a CM Work Order
To edit a CM Work Order, select CM Work Orders from the Work Order menu. The dialog, fields and instructions are the same as for Create CM Work Order. The difference is you are in a view mode. Select the record you want by using Find or the file navigation buttons, and then specify the action you want to perform by pressing either New, Edit, or Delete. The Work Order dialog is described in the section below.
Adding a New CM Work Order
New CM work order records are created using the CM Work Orders function. Before creating a new CM work order, you may want to browse the list of pending work orders to avoid double entry of the same request.
Required Information
To add a new CM work order, you must specify if the work order is Scheduled, Unscheduled or a Safety, and provide the following information:
EQUIPMENT ID
PRIORITY
BRIEF DESC.
CATEGORY
NATURE OF DEFICIENCY
REQUESTER
REQUESTED COMPLETION DATE
The equipment items entered in the Equipment ID field must be added to the system using the Equipment Information function before you can include them in a work order unless you select the Untagged Component option.
The Category and Requester must be added to the system using the Task Category Information and Employee functions before you can include them in a work order record.
The CM Work Order Screen
The following is a sample of the main CM Work Order screen. Examples of dialog boxes for individual fields are provided in the detailed procedures:
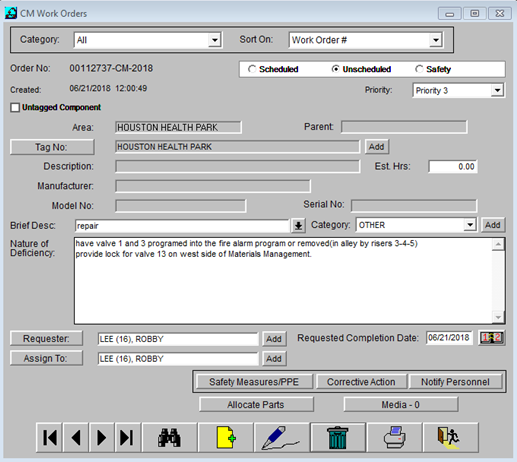
The Menu Bar at the top of your screen displays the Main Menu (not shown). You may select another choice from the Main Menu, while the dialog is displayed. Switch windows using the windows keyboard shortcut (e.g. Ctrl-F6), or pull-down Window from the main menu and select the other window. The active window has a check mark beside it. This feature permits you to work on other functions such as Parts and Personnel that are prerequisite to the CM Work Order.
The top of the CM Work Orders dialog identifies the work order by number, type, and priority.
A checkbox called Untagged Component makes provision for CM Work Orders which are not associated with tagged equipment.
The equipment box displays the equipment information. If you selected an item from the Equipment List, the information displayed comes from the equipment record. If you entered an Untagged Component, the screen displays the information that you entered.
Brief Desc., Category, and Nature of Deficiency fields describe the reason for the work order.
Safety Measures/PPE, Corrective Action, and Notify Personnel button fields identify the steps needed to fix the problem. Each of these fields leads to individual dialog boxes.
Complete the following steps to add a new CM work order:
Access the Create CM Work Order function by selecting Work Orders from the Main Menu and then selecting Create CM Work Orders from the Work Orders menu.
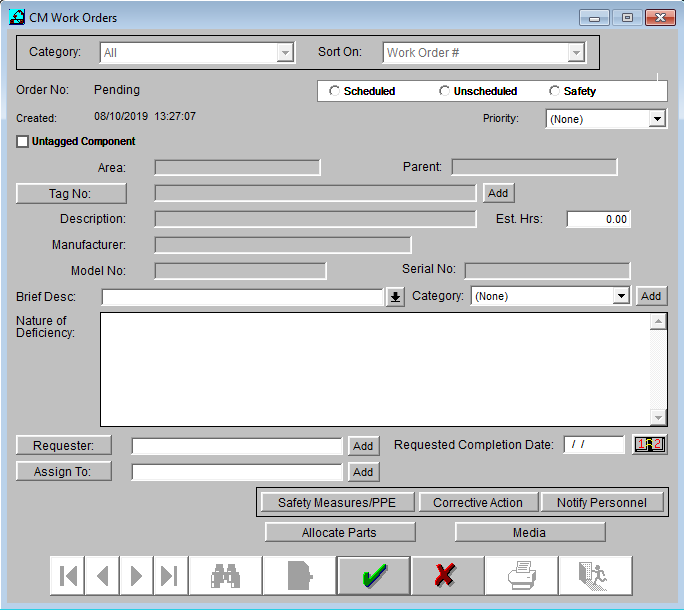
Notice that the Control Bar options have changed. Only Save and Cancel are now available.
The system displays Pending in the Order No field. An order number is assigned to the work order by the system when it is printed. Order numbers consist of a sequentially assigned 8-digit number and a 2-letter suffix (for example, 00011242SA). The suffix indicates if the work order is Scheduled (SM), Unscheduled (UM), or a Safety (SA).
Identify the CM work order type by clicking the appropriate radio button:
Scheduled: a work order that needs to be completed within a reasonable period of time but is not an immediate need. Although this type of CM work order request can often be scheduled, it should not be confused with a preventive maintenance (PM) work order that can also be scheduled (see Preventive Maintenance Work Orders for more detail).
Unscheduled: a work order that needs to be completed as soon as possible. Unscheduled work orders are generally a higher priority than scheduled work orders.
Safety: a work order for a condition that represents a safety hazard to facility employees (for example, a guard rail is loose on the third level). Safety work orders are considered emergencies and are automatically assigned the highest priority.
For Scheduled and Unscheduled work orders, press the drop-down arrow in the Priority field. The Priority field identifies the importance of the work order and can be used to effectively manage heavy workloads. Select the appropriate number. 1 represents the highest priority after a Safety. 4 represents the lowest priority. Click on the appropriate response.
Note: Safety work orders are automatically assigned a priority of “Safety”. The “Safety” priority is considered the highest priority and is reserved for Safety work orders only.
The next step is to identify the piece of equipment that requires maintenance. You have two options. You can select the piece of equipment from the Equipment List or select the Untagged Component box. An untagged component is something requiring maintenance that is not considered to be an equipment item (for example, a leaky hose).
Note: To maximize the features and benefits of using the Mechanic's Mate System, you should select from the Equipment List whenever possible. CM work orders for untagged components are not tracked in the equipment history files.
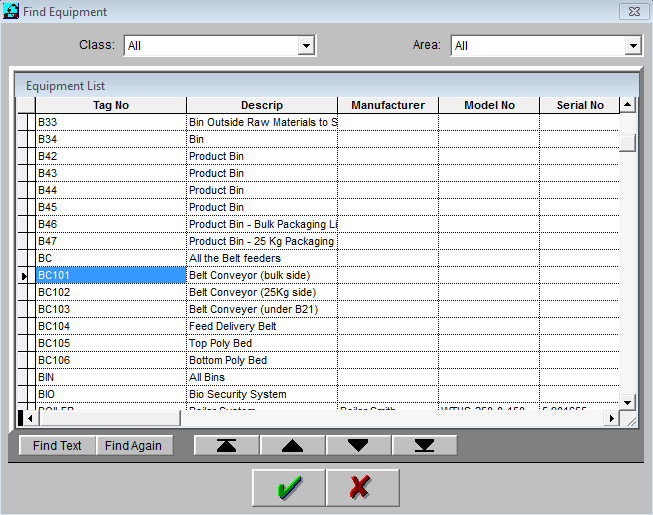
Click on the Tag Number push-button. The system displays a screen similar to the following:

If the item requiring maintenance is not available on the Equipment List, add it to the list or Cancel to return to the CM Work Orders screen and click on the Untagged Component box. Items can be added to the Equipment List by using the Equipment Information function in the Main Menu.
Notice the Area and Type fields near the top of the screen. You can select a specific area and/or equipment type to focus the Equipment List on a more specific group of equipment.
If you do not see the equipment you are looking for, be sure to set both fields to All before using the Untagged Component option or adding the item to the Equipment List.
To select an item from the Equipment List, double click on the equipment name. The system returns you to the CM work order screen. To exit the list without making a selection, press Cancel.
Identify the number of hours that you expect the work order to require for completion in the Est. Hrs. field. This information is used by the Resource Requirements function to estimate the number of employee hours needed to complete this order and all outstanding work orders.
The Brief Desc field identifies the basic nature of the service request and accepts up to 40 characters. Enter a short description that clearly identifies the maintenance request or problem. This field is required information.
Select a category. The Category field is used to group work orders based on the general nature of the requested tasks. For example, a work order request to fix a forklift that won’t start might be categorized as a Mechanical work order. The Personnel/Resource Requirements function uses this information to estimate the resources needed to complete each category of work orders. This information assists in scheduling work orders and identifying the resources needed to complete the tasks.
Enter a detailed description of the problem or service request in the Nature of Deficiency box. This information will assist the facility employee(s) in being prepared to further investigate or complete the work order request. This field is required information.
The Requester field identifies the person that reported the request for services. This field is required information. The requester must be registered as an Employee using the Employee function prior to creating the work order.
Click on the Requester button. The system displays the Employee List. You must select the requester from the displayed list.
Enter the date when the work order should be completed. Type in the date using the MMDDYYYY format or click on the date book icon next to the field to select the date from a calendar.
If the work order requires the use of safety measures or personal protective equipment (PPE), click on the Safety Measures/PPE button. The system displays the following dialog:
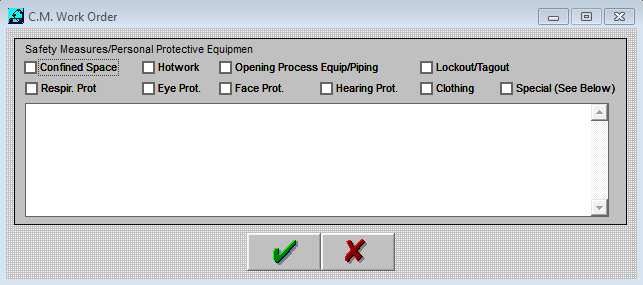
Several standard safety measures and types of personal protective equipment are identified across the top of the box. Click the toggle box for each item needed for the work order. Click on Special (see below) and then type in the information for any additional safety measures that should be followed or protective equipment that should be used. You can also use the text box to provide explicit instructions for using the safety equipment.
If you already know what corrective actions need to be taken to complete the work order request, press the Corrective Action button. The system displays a dialog box similar to the following:
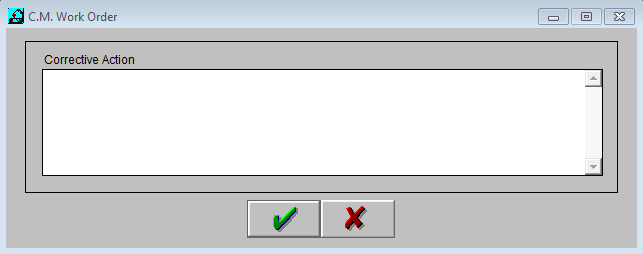
Type any instructions or tasks that will help the facility employee(s) complete the work order. Then press Save to return to the CM work order screen.
If any managers or other facility employees need to be notified about the work order (before starting work, while work is in progress, or after work has been completed), click on the Notify Personnel button. The system displays the following dialog box:
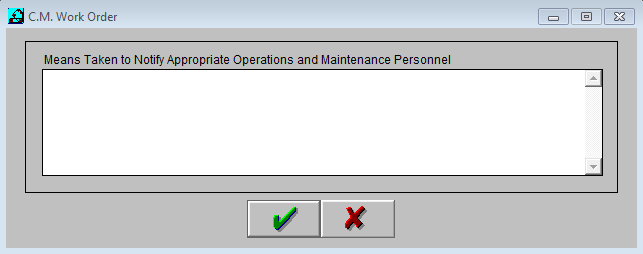
This text area is useful if you need to obtain approval for access to a particular area or to the machinery requiring repair. There may also be safety reasons for giving advance notification of your intention to work on a particular machine or in a particular area. Or it may be company policy to always notify the area supervisor before starting work and after finishing work.
To allocate parts to the work order, press the Allocate Parts button. Press the Lookup button to display the list of parts. Select each part and indicate the quantity to be allocated. Press Save, then Exit to return to the work order screen.
Mechanic's Mate will not allow the allocated quantity to exceed the on-hand quantity unless the user has override rights.
When all available information has been entered about the CM work order, press Save. The system exits the work order record and returns to the CM Work Order screen. Notice that the Control Bar options have changed and he work order number has been assigned. This number is configurable. See Chapter 7.
You can press the Print/Preview button on the Control Bar to print the work order, press Find or use the navigation buttons to access a new work order record, or press Exit to exit the CM Work Order function. Plant procedures will determine if you print the work order now or wait to print it until plant employees are ready to begin work on it.
Printing a CM Work Order
This section provides detailed instructions for printing a CM Work Order. Most facilities will print the work order for the plant employees to reference while working on the work order request.
If this is the first time the work order has been printed, the system will assign an identification number to the work order. This number is used to identify the work order on lists and reports.
If you print the work order later, you will need to bring it to the screen again to print:
Access the CM Work Orders function. Select Work Orders from the Main Menu and then selecting CM Work Orders from the Work Orders menu.
Access the work order record. Press Find in the Control Bar to display the pending work orders. Then double click on the work order number. The system displays the selected work order.
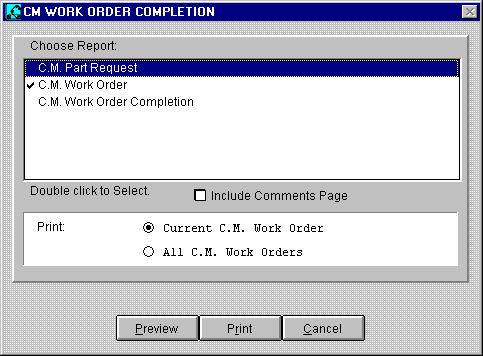
Press Print/Preview in the Control Bar. The system displays the following dialog:
The check mark preceding the report name indicates that it has been selected.
The bottom box lists your content options. Click on the appropriate radio button.
You can preview or print the report.
To preview the report, press Preview. The system displays the Preview screen that enables you to page through the report and zoom in for a closer look. When you are finished previewing the report, press OK and the system returns you to the Print/Preview screen.
Press the Print button. The system displays the standard Windows Print screen. Complete the Windows Print screen information. For detailed instructions, refer to a Windows manual.
Press OK to print the report. You can interrupt the print process by pressing Cancel.
When all pages have been sent to the printer, the Print/Preview screen reappears briefly and is then replaced by the CM Work Orders screen. Notice also that an identification number has now been assigned to the work order.
Completing a CM Work Order
After a CM work order has been added using the CM Work Order function, you use the CM Work Order Completion function to update work order information and post the work order.
In most cases, the work order task has been completed by the plant employees and final information is being entered before closing out the work order on the Mechanic's Mate System.
To access the CM Work Order Completion function, select Work Orders/CM Work Order Completion.
Required Information
When updating CM work order information, you can revise, but not delete, information in the following fields:
Equipment Id
Priority
Brief Desc.
Category
Nature of Deficiency
Requester
Requested Completion Date
The CM Work Order Completion Screen
The following is an example of the main CM Work Order Completion screen. Examples of dialog boxes for individual fields are provided in the detailed procedures:
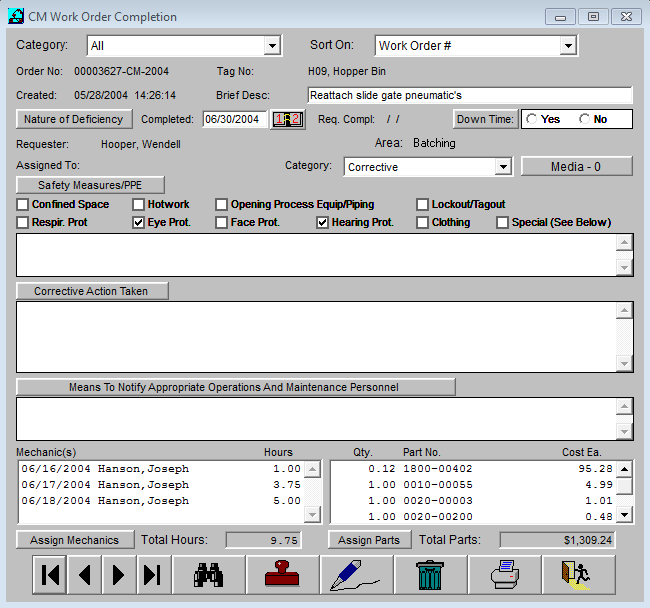
Information fields near the top of the screen identify the work order and its purpose. To view or update the detailed description of the work order, press the Nature of Deficiency button near the top left corner.
The middle portion of the screen displays the information currently on file for the work order. This information can be updated.
The bottom portion of the screen contains new information fields that collect information about the resources used to correct the reported problem.
You will notice that this function does not use the standard Control Bar. Instead, the Post option is included.
Complete the following steps to enter work order completion information and post the work order.
Access the CM Work Order Completion function.
Access the work order record. Press Find in the Control Bar to display the pending work orders. Then double click on the work order number. The system displays the selected work order.
Review the information displayed about the work order and update as necessary. To review and/or update the detailed description of the problem, press the Nature of Deficiency button.
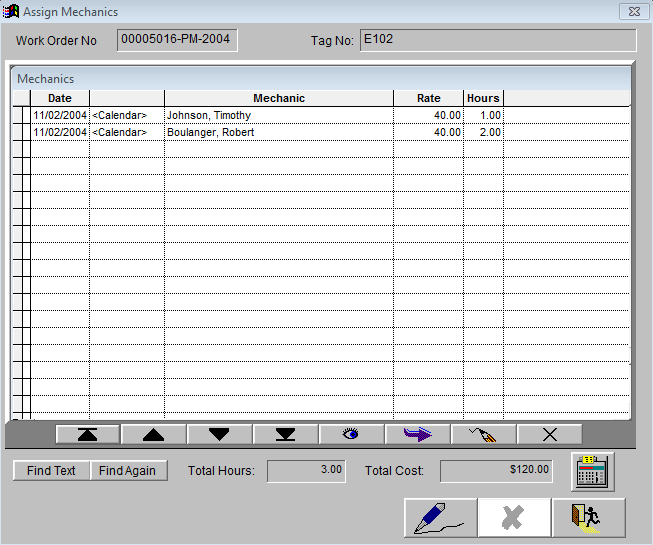
Press the Assign Mechanics button. The system displays a screen similar to the following:
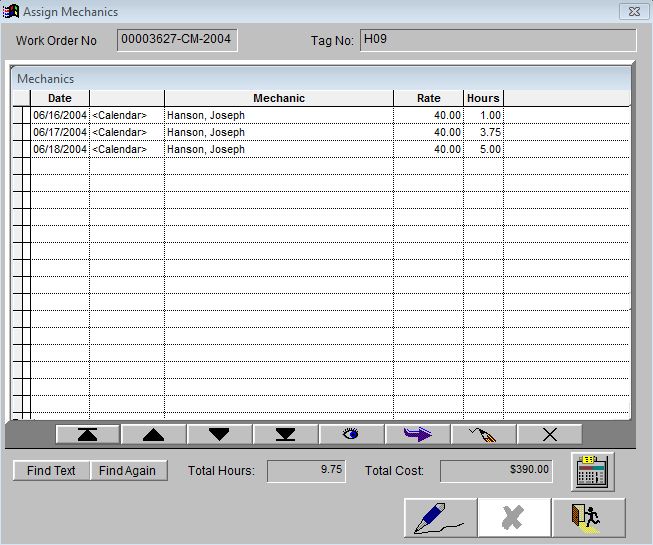
This screen is used to record information about when work was done, who did the work, and how long they spent working on it.
The system displays buttons at the bottom of the table. The four on the left are used to move around in the list of mechanics that have worked on the work order.
You can use the Lookup button or the Add button to add to the list of mechanics that have worked on the work order. If you need to add a previously added mechanic a second time (he has worked on the work order for more than one day), you must use the Add button.
Both the Lookup and the Add button display the Employee List after you press the button. To select a mechanic, double click on the employee’s name.
To replace a currently assigned mechanic with a different mechanic, select the mechanic to be replaced and then press the Lookup button. Double click to select the new mechanic from the displayed list. The system automatically replaces the previously assigned mechanic with the newly selected mechanic.
To edit the work order information for a previously assigned mechanic, you can use your mouse to directly access the field or press the Edit button.
The Delete button is used to remove a mechanic from the list of those that have worked on the work order.
Press Add in the middle function bar to add a mechanic. The system displays the Employees List. Double click on the employee’s name.
Enter the date when the mechanic worked on the work order. You can type in the date using the MMDDYYYY format or click on the Calendar next to the date field to select the date from a calendar.
The system prefills the Rate column with the rate assigned to the employee in the employee record. If you update this information, it only applies to this specific work order. To update it for all work orders, you must update the employee record using the Personnel/Employee function.
Enter the number of hours that the mechanic worked in the Hours column.
Repeat for each employee that worked on the work order. When all mechanic information has been entered, click on the Calculator icon near the bottom of the screen. The system calculates the total number of hours worked and the total labor costs. The totals appear in the Total Hours and Total Cost fields below the Control Bar.
Press Save and then press Exit in the Control Bar to exit the Mechanic screen and return to the CM Work Order Completion screen.
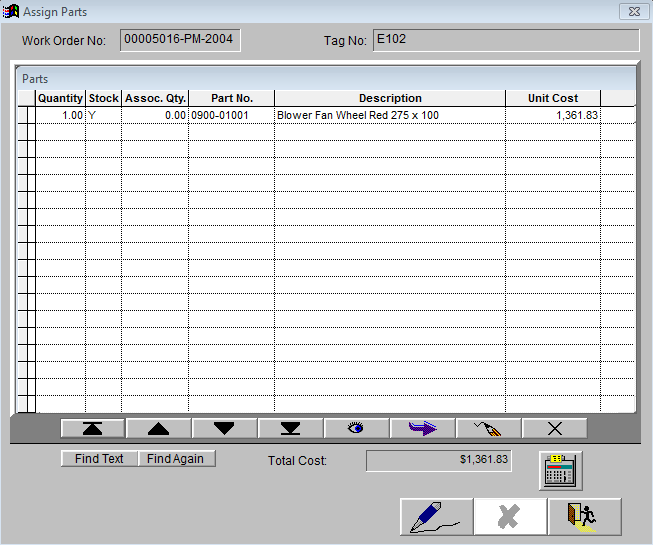
Press the Assign Parts button. The system displays a screen similar to the following:

This screen is used to identify the parts that were used to complete the work order. The system uses this information to document the cost of parts needed to complete the work order. Any parts previously allocated to the work order will be displayed. These quantities can be modified to reflect actual amounts unless the part withdrawal function has been activated in Program Setup. (Utilities)
The system displays buttons at the bottom of the ASSIGN PARTS table. The four on the left are used to move around in the list of parts that have been assigned to the work order.
Use the Lookup button to display the list of parts used to complete the work order.
To select a part, double click on the part.
If there are more parts use Add or Enter to advance the cursor to the next line.
Use Lookup to select the next part.
To replace a currently assigned part with a different part, select the part to be replaced and then press the Lookup button. Double click to select the new part from the displayed list. The system automatically replaces the previously assigned part with the newly selected part.
To edit the work order information for a previously assigned part, you can use your mouse to directly access the field or press the Edit button.
The Delete button is used to remove a part from the list of parts used to complete the work order.
Press Add in the middle function bar to create a new line for a part. The system pre-fills the Quantity column with 0.00 and the Stock column with Y for “Yes”.
In the Quantity column, enter the number of units of the part used. For example, enter 2 if you used 2 bolts.
If the part is a stocked item, press the Lookup button in the function bar. The system displays the Parts List.
Double click on the part number.
The system prefills the remaining fields with the information on file for the selected part.
Fill in any missing information.
You can revise the part’s Description and Unit Cost. Any changes you make apply to this specific work order only. To change the information in the part’s record, use the Part Information function.
If the part is not a stocked item, change the response in the Stock column to N and enter the detailed information about the non-stock part in the remaining fields.
Repeat for each part used to complete the work order.
When all parts information has been entered, click on the Calculator icon near the bottom of the screen. The system calculates the total cost of the parts used.
Press Save and then press Exit in the Control Bar to exit the Assign Parts screen and return to the CM Work Order Completion screen.
A work order cannot be posted while an associated part request is in process.
Before completing the work order, you must indicate if there has been any down time associated with the project. In the down time field, toggle Yes if down time was logged or No if it wasn’t. The Down Time button displays a dialog for adding the actual dates and hours of down time if applicable.
If down time is indicated, but its information (hours, dates) has not been completed, the work order will not post.
A down time history report is available under Equipment/Equipment Profile. A down time report can be generated for a specific time period, a specific piece of equipment, or both.
When all information about the work order completion has been entered, press Save.
If the reported problem has been fixed, all work on the work order has been completed, and all information about the work order has been entered into the Mechanic's Mate System, you are ready to print and post the completed CM work order (see next sections). Otherwise, select another CM work order to update or press Exit to return to the Main Menu.
Printing a Completed CM Work Order
Once you have completed the CM work order information, you will want to print a hard copy for your records. The Mechanic's Mate System offers two reports:
You can print the CM Work Order Completion Report that displays information about the work order including labor and parts costs.
You can print the updated CM Work Order that just contains the information about the work order.
Complete the following steps to print the CM Work Order or the CM Work Order Completion Report:
Access the CM Work Order Completion function by selecting Work Orders from the Main Menu and then selecting CM Work Order Completion from the Work Orders menu.
You can focus the reports on a specific CM work order or include all active CM work orders. To include all active CM work orders, proceed to step 3. To focus the reports on a specific CM work order, press Find in the Control Bar to display the pending work orders and double click on the work order number. The system displays the selected work order.
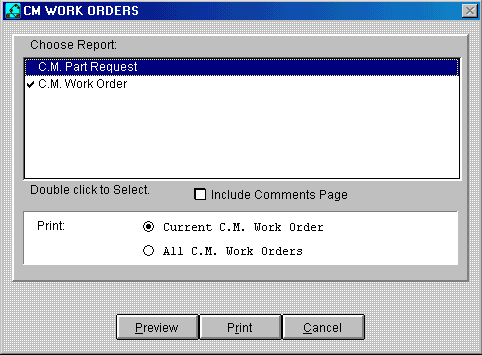
Press Print/Preview in the Control Bar. The system displays the following dialog:
The check mark preceding the report name indicates that it has been selected to be previewed or printed. Notice that the CM Work Order has been pre-selected. To select the other choice, CM Word Order Completion, double click on it and the check mark will move.
The bottom box lists your content options. The content options are the same for both reports. Click on the appropriate radio button.
You can preview or print the report.
To preview the report, press Preview. The system displays the Preview screen that enables you to page through the report and zoom in for a closer look. When you are finished previewing the report, press OK and the system returns you to the Print/Preview screen.
Press the Print button. The system displays the standard Windows Print dialog. Complete the Windows Print dialog information. For detailed instructions, refer to a Windows manual.
Press OK to print the report. The system begins generating the report and displays a message box that shows the number of each page as it is spooled to the printer. You can interrupt the print process by pressing Cancel.
See Chapter 7, Reports for a sample of the reports.
Posting a CM Work Order
When all work on the CM work order has been completed by the mechanics and all information about the work order has been input into the Mechanic's Mate System, it is time to post the CM work order.
Posting a work order closes the work order record and moves it to the historical files. Once a CM work order has been posted, it is not accessible through the CM Work Orders function or the CM Work Order Completion function. To view, edit or print a posted CM work order, use the Work Order History function.
CM work orders are posted using the CM Work Order Completion function. Complete the following steps to post the CM work order:
Access the CM Work Order Completion function by selecting Work Orders from the Main Menu and then selecting CM Work Order Completion from the Work Orders menu.
Access the work order record. Press Find in the Control Bar to display the pending work orders. Then double click on the work order number. The system displays the selected work order.
Press POST on the Control Bar. A confirmation dialog is displayed.
Press OK to post the CM work order.
As the system moves the CM work order record to the historical files, it displays a small box in the top right corner that says, “Posted”.
The record of the next CM work order is displayed. You can update or post another CM work order or press Exit to leave the CM Work Order Completion function and return to the Main Menu.
Deleting a CM Work Order
Although posted work orders cannot be deleted, there are situations that result in the need to delete an active CM work order (for example, the same work order request was entered twice).
Posted CM work orders cannot be deleted.
Complete the following steps to delete an active CM work order:
Select the CM Work Order or the CM Work Order Completion function from the Work Orders menu.
Access the work order record. Press Find in the Control Bar to display the pending work orders. Then double click on the work order number. The system displays the selected work order.
Press Delete on the Control Bar. A confirmation dialog is displayed. To continue the Delete process, press OK. To exit the Delete process and return to the work order record, press Cancel.
Once you delete the work order, it cannot be retrieved.
After you press OK, the system deletes the work order, displays a small “Deleted” message box in the top right corner of the screen and displays the next work order.
Preventive Maintenance (PM) Work Orders
PM work orders are maintenance tasks that extend the life of the equipment when done at the appropriate intervals. PM work orders are like appointments to get your car’s oil changed every 3000 miles.
While CM work orders are created upon request, PM work orders are created ahead of time. You can then review the list of PM work orders due and decide which PM maintenance tasks can be worked on.
PM Menu Selections
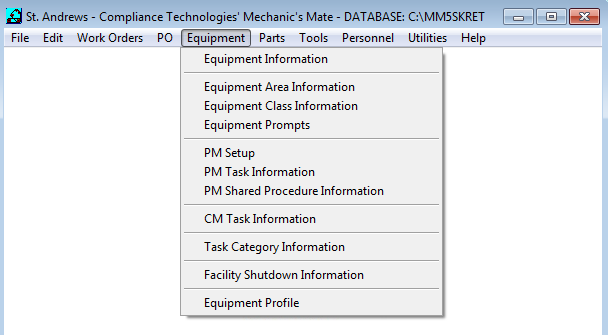
Preventative Maintenance is configured using the following functions in Equipment menu:
PM Setup: This function creates Preventative Maintenance (PM) work orders by connecting a maintenance task to a specific piece of equipment.
PM Task Information: Maintenance tasks are added to the system using the PM Task Information function. This function identifies the different preventive maintenance tasks that can be performed.
Task Category Information: This function identifies the different categories of maintenance tasks performed at your facility. For example, you may have electrical tasks, mechanical tasks, lubrication tasks, etc. This information is used by the Resource Requirements function to identify the different types of resources needed to complete the pending work orders.
Facility Shutdown Information: This function identifies the time periods when your facility will be shut down. Shutdown information can be used to schedule work orders that require total units or processes to be shut down (for example, turnaround).
PM Work Order Process
The following steps outline the basic flow of the PM work order process. The actual processes within each step have more detail that may vary for each individual work order but all PM work orders will follow this general process:
A maintenance task is identified. If the equipment or the task has not been added to the Equipment file or the Task file, add that information now.
Create the work order using the PM Setup function. The new work order is added to the list of pending PM work orders based on the due date.
Print the PM work order using the PM Work Orders Due function. The system assigns an identification number, prints the work order, and adds it to the list of pending work orders.
The work order is given to the appropriate employee(s) for completion. They complete the work order.
Using the PM Work Order Completion function, detailed information is added to the Work Order about who completed the work, how much time it took, what parts were used, and who was notified.
The work order is posted using the PM Work Order Completion function. The system marks the work order as being completed, removes it from the pending working orders list, and files it in the work order history files.
PM Setup
New PM work orders are created using the PM Setup function.
PM work orders use the equipment defined by the Equipment Information function and the tasks defined by the PM Task Information function. If the new PM work order contains a piece of equipment or a task that has not yet been added to the respective files, you must exit the work order to add them.
To access the PM Setup function, select Equipment/PM Setup
Required Information
To add a new PM work order, you must identify the equipment item and task. The Equipment ID field requires that you select an item from the Equipment List. The Task ID field requires that you select a task from the Task List.
The following is a sample of the main PM Setup screen:
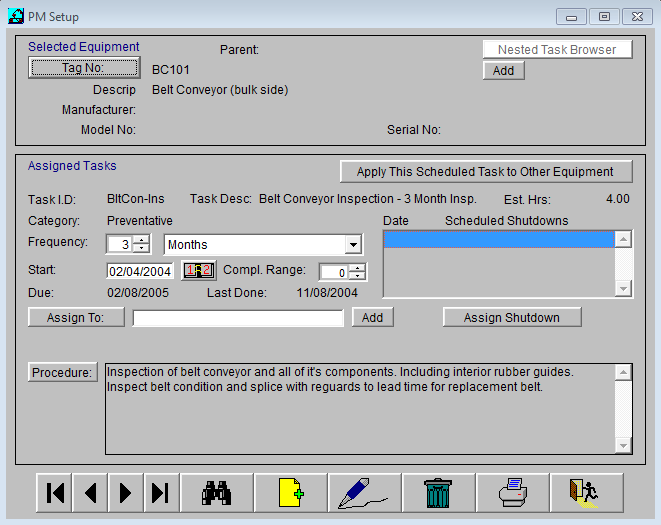
The Menu Bar displays the Main Menu.
The middle portion of the screen contains two beveled boxes. The top box identifies the equipment. The bottom box identifies the task.
The standard Control Bar appears across the bottom of the screen. Unavailable functions are dimmed. The options on the bar change when you access or edit a work order record. See Chapter 1 for more information.
Adding a PM Work Order
Complete the following steps to add a new PM work order:
Access the PM Setup function from the Equipment menu.
Identify the piece of equipment that will require maintenance. To identify a different piece of equipment than the one displayed, press the Tag button located underneath “Selected Equipment”.
The system displays a screen similar to the following:
Notice the Area and Type fields near the top of the screen. You can select a specific area and/or equipment type to focus the Equipment List on a more specific group of equipment.
To exit the list without making a selection, press Cancel.
To select an item from the Equipment List, double click on the equipment name. The system returns you to the PM work order screen.
Press New in the Control Bar to assign a task to the equipment. The system displays a screen similar to the following:
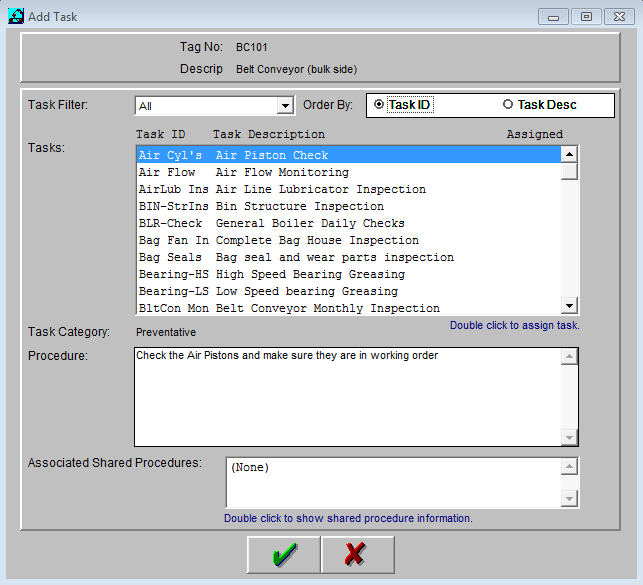
The top beveled box identifies the piece of equipment that is the subject of the task.
The bottom box is used to select the task.
The Task Filter enables you to display the task list in a way that meets your immediate needs. Press the drop-down arrow and select a task category. The system removes tasks of all other categories from the displayed list.
The Order By field also helps you sort the task list. Click on the radio button in the Order By field to perform an alphanumeric sort by ID number or Description.
Double click on a task to select it, the system automatically takes you back to the PM Setup screen. Currently assigned tasks display a check mark at the right edge of the window.
If you select a task that is already assigned, the check mark disappears and the task is de-selected. Double-click again to restore.
Identify the frequency at which the maintenance task should be performed. The large text box provides a popup list of time parameters (for example, weeks and months). The small box identifies the number.
If the time parameter used for the frequency was one of the last ‘last day of every’ choices, then it may be appropriate to establish a completion range. This allows the task to be completed early without scheduling the task again for the same time period. The number in the completion range indicates days. The maximum range is 99 days.
Enter the date when the PM task was last performed in the Start field. You can type the date or click on the datebook icon to select the date from a calendar. The system calculates the date when the task should next be performed by adding the interval entered in the Frequency field to the Start date. It displays this date in the Due field. The Last Done field will not display a date until a PM work order has been processed and posted using the Mechanic's Mate system.
If the task requires that equipment be shut down or that the plant be closed for its completion, press the Assign button under Scheduled Shutdowns to display the following dialog.
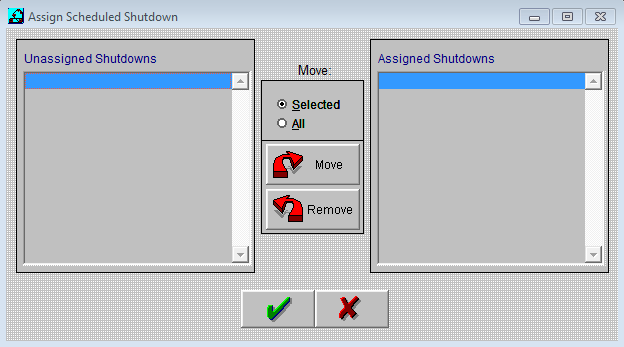
The Unassigned Shutdowns area on the left identifies the shutdown periods that have been defined. Shutdown periods are defined using the Equipment/Facility Shutdown Information function.
The box on the right identifies the shutdown periods that have been assigned to the task.
To assign a shutdown period to the task, you move it from the left box into the right box.
To assign all defined shutdown periods to the task, click on the All radio button and then press Move.
To assign a specific shutdown period, click on the Selected radio button and then double click on the shutdown period.
When you are finished assigning shutdown periods, press OK to return to the PM Setup screen.
The Procedure box contains the detailed instructions for completing the task that was entered when created. Review the instructions and make any revisions that are needed for the equipment that has been selected. This should include things to look for, things that should not be done, etc. Well written procedures can eliminate the need for rework later. Edit procedures in Equipment/PM Task Information.
You can leave PM Setup dialog on the screen. When you select PM Task Information, its window overlays the PM Setup screen. When you are done making any changes, press Exit and PM Setup reappears.
Verify that the PM setup information is correct. Press Save.
The Tool Bar becomes active. You can now create a new PM work order or press Exit to leave the PM Setup function and return to the Main Menu.
Printing the PM Assigned Task Report
Select Equipment/PM Setup to print the PM Assigned Task Report.
Press the Tag Number button located underneath Selected Equipment to display a screen similar to the following:
Notice the Class and Area fields near the top of the screen. By pressing the drop-down arrows, you can select a specific class and/or area to focus the Equipment List on a more specific group of equipment.
To select an item from the Equipment List, double click on the equipment name. The PM Setup screen displays the chosen equipment item.
If no task has been assigned to the Equipment Tag, the Print/Preview button is grayed-out.
If you need to identify the equipment item by the tasks that are already assigned to it, return to the PM Setup screen. Pull down any of the following PM Menu items in the Work Orders Menu. You do not need to leave the PM Setup to do this.
PM Work Orders Due displays tasks assigned to equipment but not yet completed
PM Work Orders Completion displays completed tasks assigned to equipment.
PM Work History displays a list of PM (and CM) tasks assigned to equipment and posted.
When you find the equipment item associated with your PM task, select and press Exit. The equipment item will appear in the PM Setup dialog.
Press Find in the Control Bar to display a list of the tasks assigned to the equipment item. Double click on the task to select it. The PM Setup screen displays the chosen task. To exit the list without making a selection, press Cancel.
Press Print/Preview in the Control Bar. You can print the report for a currently displayed task or for all of the tasks assigned to the selected equipment item. The system displays the following dialog box:

The PM Assigned Task Report is the only available report. The check mark preceding the report name indicates that it has been selected. The bottom box lists your content options. Click on the appropriate radio button.
To preview the report, press Preview. The system displays the Preview screen that enables you to page through the report and zoom in for a closer look. When you are finished previewing the report, press OK and the system returns you to the Print/Preview screen.
Press the Print button. The system displays the standard Windows Print dialog. Complete the Windows Print dialog information.
Press OK to generate the report. You can interrupt the print process by pressing Cancel.
When all pages have been sent to the printer, the Print/Preview screen reappears briefly and is then replaced by the PM Setup screen.
PM Work Order Numbers
When you print a PM work order, the Mechanic's Mate System automatically assigns an identification number to each printed work order. The identification number is configurable. See Chapter 7. The PM Work Orders Due function is used to print the PM work orders.
PM Work Orders Due
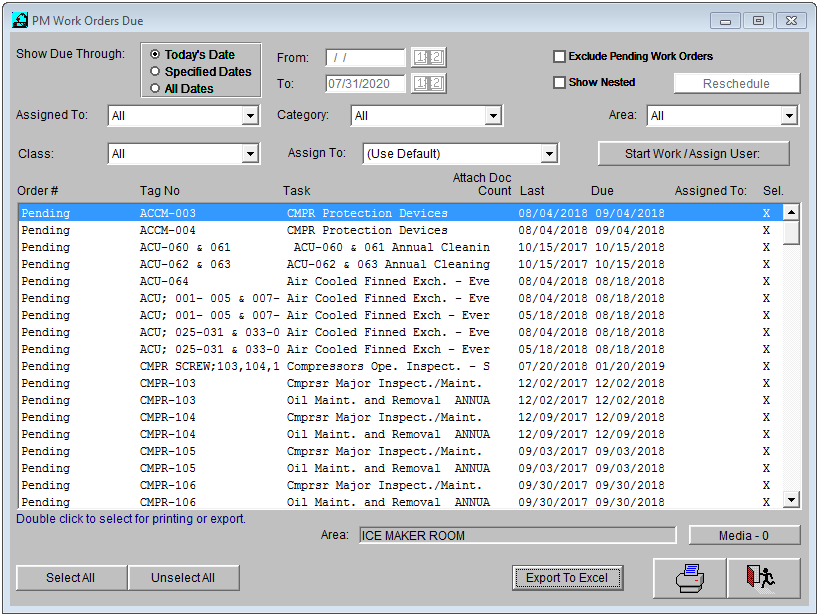
To access the PM Work Orders Due function, select Work Orders/PM Work Orders Due. The PM Work Orders Due dialog displays as shown below.

The filters at the top of the screen enable you to display a specific set of pending PM work orders. The filters allow the user to select a specific category, area, and class in any combination.
The Show Nested check box when checked shows the child tasks, if any, that are associated with the highlighted task when checked.
The Reschedule button enables you to change the start date and completion date of a work order.
The Start Work / Assign User button assigns numbers to Pending work orders and also assigns the mechanic designated within the Assign To drop-down list to the selected work orders.
The List Region shows the PM work orders that meet the criteria established by the filters at the top of the screen.
The Export To Excel button allows the user to save the List Region data for selected work orders along with relevant related data to an Excel file.
The Control Bar offers the Print/Preview and Exit options
Any associated tools or parts will be printed on the work order.
To Print PM Work Orders
Access the PM Work Orders Due function.
The PM Work Orders Due dialog displays a work orders list. The work orders list presents all pending work orders before printed work orders (printed work orders have a number assigned to them). Within each grouping (pending work orders and printed work orders), the work orders are presented in chronological order based on the due date. To limit the list to PM work orders that have been printed, click on the toggle box for the Exclude Pending Work Orders field.
To find out which work orders need to be done today, click on the Today’s Date radio button. All work orders with a due date of today or earlier are displayed in the text box.
To find out which work orders need to be completed for a specific period of time (for example, next week), click on the Specified Dates radio button and enter the start and end date for the time period in the From and To fields. Only PM work orders with a due date that falls within the specified period are displayed.
To include all work orders in the list without regard for their due date, click on the All radio button. All PM work orders are displayed.
Select the PM work orders to be printed, then double click on the specific work orders that you want to print. An X mark appears in the right margin.
If most work orders should be printed, press the Select All for Printing button in the bottom left corner of the screen. Then double click on the work orders that should not be printed.
When all work orders needing to be printed have been selected, press the Print/Preview button. The system displays the following window:
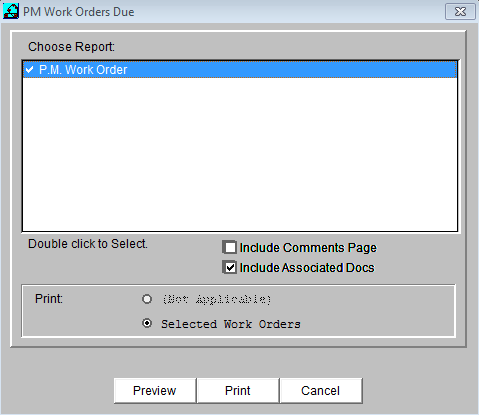
The PM Work Order is the only available report. The check mark preceding the report name indicates that it has been selected.
To include a comments page with spaces for parts lists, etc., toggle the box.
The bottom box lists your content options. Click on the appropriate radio button.
To preview the report, press Preview. The system displays the Preview screen that enables you to page through the report and zoom in for a closer look. When you are finished previewing the report, press OK and the system returns you to the Print/Preview screen.
Press the Print button. The system displays the standard Windows Print dialog. Complete the Windows Print dialog information. For detailed instructions, refer to a Windows manual.
Press OK to print the report. If the report is long, you can interrupt the print process by pressing Cancel.
When all pages have been sent to the printer, the PM Work Orders Due screen is displayed.
Exporting PM Work Orders Due to Excel
To access the PM Work Orders Due function, select Work Orders/PM Work Orders Due. The PM Work Orders Due dialog displays as shown below.
The filters at the top of the screen enable you to display a specific set of PM work orders. The filters allow the user to select a specific date range, assigned to, category, area, and class in any combination.
The PM Work Orders Due dialog displays a work orders list. The work orders list presents all pending work orders before printed work orders (printed work orders have a number assigned to them). Within each grouping (pending work orders and printed work orders), the work orders are presented in chronological order based on the due date. To limit the list to PM work orders that have been printed, click on the toggle box for the Exclude Pending Work Orders field.
Work orders targeted for exporting to Excel must be displayed and marked as selected within the list.
To include all work orders in the list without regard for their due date, click on the All radio button. All PM work orders are displayed.
Select or deselect the PM work orders to be exported by double clicking on the specific work order within the list. An X mark appears in the right margin of work orders that are selected.
If most work orders should be exported, press the Select All button in the bottom left corner of the screen. Then double click on the work orders that should not be exported; so that they are not selected.
Below is a sample of the PM Work Orders Due dialog showing all work orders selected for export that are displayed within the work orders list. Notice the X mark appearing in the right margin of the work orders displayed in the list.
When all work orders needing to be exported have been selected, press the Export To Excel button. The system displays the Save As dialog as shown below:
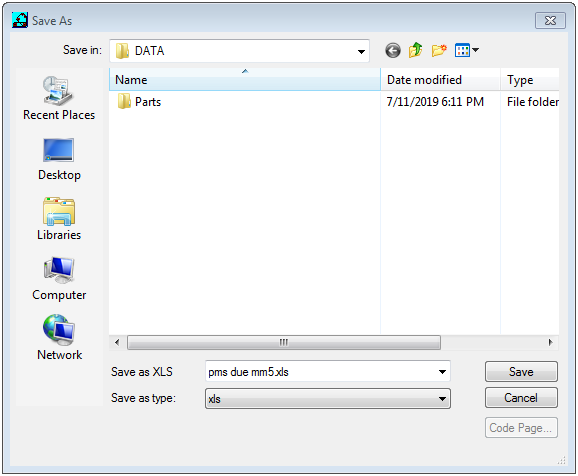
Using the Save As dialog shown above, please specify the file name and location for the work order file in Excel format. NOTE: The first time this feature is used, the location defaults to the Mechanic’s Mate DATA folder; however, the Documents folder within Libraries is a more suitable location.
Press Save to complete the export process. If the file already exists, a Yes/No dialog will be presented to confirm overwriting.
At the end of the Export to Excel process, the PM Work Orders Due dialog is re-displayed, and the previously selected work orders remain.
The exported Excel file will contain the data the following column headings:
order_no
area
tag_no
task_id
interval
frequency
orig_assigned
currently_assigned
last_done
started_on
open_status
work_date
due_date
completion_range
category
task_desc
Completing a PM Work Order
After a PM work order has been added and printed, you use the PM Work Order Completion function to update work order information and post the work order.
In most cases, the work order task has been completed by the plant employees and final information is being entered before closing out the work order on the Mechanic's Mate System.
If you find yourself updating task information for a particular work order task on a regular basis, you may want to use the Equipment PM Task Information function to revise the task.
To access the PM Work Order Completion function, select Work Orders/PM Work Order Completion.
Required Information
When updating PM work order information, you can revise, but not delete, information in the following fields:
Category
Requested Completion Date
The PM Work Order Completion Screen
The following is an example of the main PM Work Order Completion screen. Examples of dialog boxes for individual fields are provided in the detailed procedures:

The Menu Bar displays the Main Menu. You may access other Menu functions and toggle between them using Window in the Main Menu or your Windows switch key (e.g. Ctrl+F6).
Information fields near the top of the screen identify the work order and its task.
The middle portion of the screen displays the information currently on file for the work order. This information can be updated.
The bottom portion of the screen contains new information fields that collect information about the resources needed to perform the PM task.
You will notice that the Post option is included in the tool bar.
Complete the following steps to enter work order completion information and post the PM work order.
Access the PM Work Order Completion function.
Review the information displayed about the work order and update as necessary.
If you find that you are consistently making the same changes to a particular task, you may want to revise the task using the Task Information function.
Press the Assign Mechanics button. The system displays a screen similar to the following:
This screen is used to record information about when work was done, who did the work, and how long they spent working on it.
The system displays buttons at the bottom of the table. The four on the left are used to move around in the list of mechanics that have worked on the work order.
You can use the Lookup button or the Add button to add to the list of mechanics that have worked on the work order. If you need to add a previously added mechanic a second time (he has worked on the work order for more than one day), you must use the Add button.
Both the Lookup and the Add button display the Employee List after you press the button. To select a mechanic, double click on the employee’s name.
To replace a currently assigned mechanic with a different mechanic, select the mechanic to be replaced and then press the Lookup button. Double click to select the new mechanic from the displayed list. The system automatically replaces the previously assigned mechanic with the newly selected mechanic.
To edit the work order information for a previously assigned mechanic, you can use your mouse to directly access the field or press the Edit button.
The Delete button is used to remove a mechanic from the list of those that have worked on the work order.
Press Add in the middle function bar to add a mechanic. The system displays the Employees List. Double click on the employee’s name.
Enter the date when the mechanic worked on the work order. You can type in the date using the MMDDYYYY format or click on the Calendar next to the date field to select the date from a calendar.
The system prefills the Rate column with the rate assigned to the employee in the employee record. If you update this information, it only applies to this specific work order. To update it for all work orders, you must update the employee record using the Personnel Employee function.
Enter the number of hours that the mechanic worked in the Hours column.
Repeat for each employee that worked on the work order. When all mechanic information has been entered, click on the Calculator icon near the bottom of the screen. The system calculates the total number of hours worked and the total labor costs.
Press Save and then press Exit in the Control Bar to exit the Mechanic screen and return to the PM Work Order Completion screen.
Press the Assign Parts button. The system displays a screen similar to the following:
This screen is used to identify the parts that were used to complete the work order. The system uses this information to document the cost of parts needed to complete the work order.
The system displays buttons at the bottom of the table. The four on the left are used to move around in the list of parts that have been assigned to the work order.
Use the Lookup button to display the list of parts used to complete the work order. To select a part, double click on the part. If there are more parts use Add or Enter to advance the cursor to the next line. Use Lookup to select the next part.
To replace a currently assigned part with a different part, select the part to be replaced and then press the Lookup button. Double click to select the new part from the displayed list. The system automatically replaces the previously assigned part with the newly selected part.
To edit the work order information for a previously assigned part, you can use your mouse to directly access the field or press the Edit button.
The Delete button is used to remove a part from the list of parts used to complete the work order.
Press Add in the middle function bar to create a new line for a part. The system pre-fills the Quantity column with 0.00 and the Stock column with Y for “Yes”.
In the Quantity column, enter the number of units of the part used. For example, enter 2 if you used 2 bolts.
If the part is a stocked item, press the Lookup button in the function bar. The system displays the Parts List. Double click on the part number. The system propagates the remaining fields with the information on file for the selected part. Fill in any missing information.
You can revise the part’s Description and Unit Cost. Any changes you make apply to this specific work order only. To change the information in the part’s record, use the Part Information function.
If the part is not a stocked item, change the response in the Stock column to N and enter the detailed information about the non-stock part in the remaining fields.
Repeat this procedure for each part used to complete the work order. When all parts information has been entered, click on the Calculator icon near the bottom of the screen. The system calculates the total cost of the parts used.
Press Save and then press Exit in the Control Bar to exit the Parts screen and return to the PM Work Order Completion screen.
A work order cannot be posted while an associated part request is in process.
Before completing the work order, you must indicate if there has been any down time associated with the project. In the down time field, toggle Yes if down time was logged or No if it wasn’t. The Down Time button displays a dialog for adding the actual dates and hours of down time if applicable.
If down time is indicated, but its information (hours, dates) has not been completed, the work order will not post.
A down time history report is available under Equipment/Equipment Profile. A down time report can be generated for a specific time period, a specific piece of equipment, or both.
When all information about the work order completion has been entered, press Save.
If all work on the work order has been completed and all information about the work order has been entered into the Mechanic's Mate System, you are ready to print and post the completed PM work order (see next sections).
Printing a Completed PM Work Order
Once you have completed the PM work order information, you may want to print the PM Work Order Completion Report for your records.
Complete the following steps to print the PM Work Order Completion Report:
Access the PM Work Order Completion function by selecting Work Orders from the Main Menu and then selecting PM Work Order Completion from the Work Orders menu.
You can focus the report on a specific PM work order or include all active PM work orders
To focus the report on a specific PM work order, press <Find> in the Control Bar to display the pending work orders and double click on the work order number. The system displays the selected work order.
Press Print/Preview in the Control Bar. The system displays the following dialog box:

The PM Work Order Completion Report and the PM Part Request are the only available reports. The check mark preceding the report name indicates that it has been selected.
The bottom box lists your content options. Click on the appropriate radio button.
You can preview or print the report. To preview the report, press Preview. The system displays the Preview screen that enables you to page through the report and zoom in for a closer look. When you are finished previewing the report, press OK and the system returns you to the Print/Preview screen.
Press the Print button. The system displays the standard Windows Print dialog. Complete the Windows Print dialog information. For detailed instructions, refer to a Windows manual.
Press OK to print the report. If it is a long report, you can interrupt the print process by pressing Cancel. When all pages have been sent to the printer, the PM Work Order Completion screen reappears.
Posting a PM Work Order
When all work on the PM work order has been completed by the mechanics and all information about the work order has been input into the Mechanic's Mate System, it is time to post the PM work order.
Posting a work order closes the work order record and moves it to the historical files. Once a PM work order has been posted, it is not accessible through the PM Work Orders Due function or the PM Work Order Completion function. To view, edit or print a posted PM work order, use the Work Order History function.
PM work orders are posted using the PM Work Order Completion function. Complete the following steps to post the PM work order:
Access the PM Work Order Completion function by selecting Work Orders from the Main Menu and then selecting PM Work Order Completion from the Work Orders menu.
Press POST on the Control Bar. A confirmation dialog is displayed. Press OK to post the PM work order. As the system moves the PM work order record to the historical files, it displays a small box in the top right corner that says, “Posted.”
The record of the next PM work order is displayed. You can update or post another PM work order or press Exit to leave the PM Work Order Completion function and return to the Main Menu.
Deleting a PM Work Order
This procedure is used to delete a PM work order that has already been created and printed. For example, it may have been decided to not perform that particular maintenance task until the next time it comes due again.
If there is no longer a need for the maintenance task (for example, you don’t have that equipment item anymore), see “Deleting a PM Task Assignment”, next in this section.
PM work orders that have already been posted cannot be deleted.
Complete the following steps to delete an active PM work order:
Select the PM Work Order Completion function from the Work Orders menu.
Access the PM work order record. Press <Find> in the Control Bar to display the pending work orders. Then double click on the work order number. The system displays the selected work order.
Press <Delete> on the Control Bar. A confirmation dialog is displayed.
To continue the Delete process, press <OK>.
To exit the Delete process and return to the work order record, press <Cancel>.
Once you delete the work order, it cannot be retrieved.
Press <OK> to confirm.
The system deletes the work order, displays a small “Deleted” message box in the top right corner of the screen and displays the next work order.
Deleting a PM Task Assignment
This procedure is used to delete the assignment of a maintenance task from the task list of a specific equipment item. This process prevents unneeded work order requests from appearing on the PM Work Orders Due list. PM work orders that have already been posted cannot be deleted.
Complete the following steps to delete a PM task assignment:
Select the PM Setup function from the Equipment menu.
Access the PM task assignment that you want to delete.
First, identify the equipment item by pressing the TAG NO. button and selecting the equipment item from the displayed list.
Then press Find in the Control Bar to display a list of the tasks assigned to that equipment item.
Double click on the task. The system displays the PM Setup screen for the selected equipment item and task.
Press Delete on the Control Bar. A confirmation dialog is displayed.
To continue the Delete process, press OK.
To exit the Delete process and return to the task assignment record, press Cancel.
Once you delete the task assignment, it cannot be retrieved.
Press OK. The system deletes the task assignment, displays a small “Deleted” message box in the top right corner of the screen and displays the next task for the equipment item.
If the equipment item has no more tasks assigned, the task portion of the screen is blank and only the Add and Exit options on the Control Bar are available.
You may also want to delete the equipment item using the Equipment Information function and/or delete the task using the PM Task Information function.
Work Order History
The Work Order History function enables you to view the work orders that have already been posted and make the necessary corrections to the stored information.
You can also print the Work History Report. Select Work Orders/Work Order History.
If you have already accessed a posted work order since signing on, the system displays the most recently maintained work order record. If you have just signed on, the system displays the first work order record in the file. Posted work order records are maintained in alphanumeric sequence (that is, 1-2-3...A-B-C...Z) using the work order identification number.
Viewing and Editing a Posted Work Order
Complete the following steps to view or edit a posted work order:
Access the Work Order History function. The system displays a screen similar to the following:
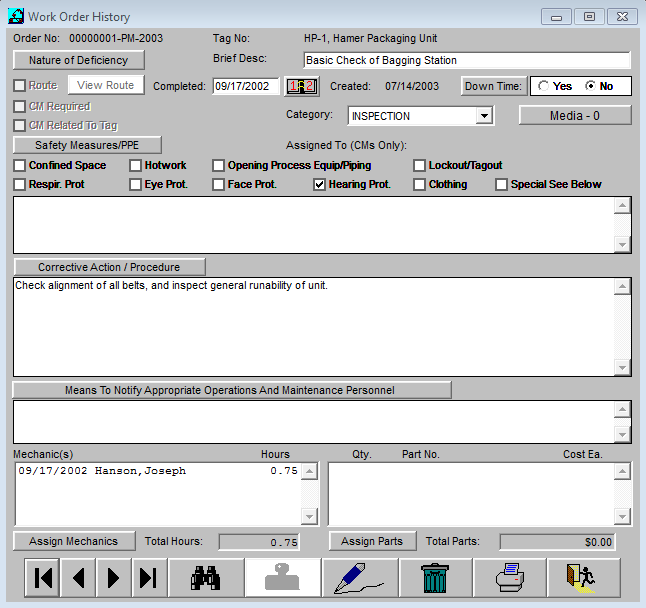
A history for a work order is displayed. Use scroll bars to view text that is not visible.
Use the Assign Mechanics and Assign Parts buttons to revise the mechanic and part assignments.
Press Find in the Control Bar to display the list of posted work orders.
Then double click on the work order number.
The system displays the selected work order.
Use your mouse or the key to access the fields and enter the new information. Notice that the Tool Bar options change after you enter a field. Only Save and Cancel are available.
When you have updated all appropriate fields, press Save in the Control Bar. To exit without saving your changes, press Cancel.
When you are finished viewing the work order, you can select another work order to view, print the Work Order History Report, or exit the Work Order History function.
Printing the Work Order History Report
Complete the following steps to preview or print the Work Order History Report:
Access the Work Order History function.
You can focus the report on a specific work order or include all posted work orders. To focus the report on a specific work order, press Find in the Control Bar to display the posted work orders and double click on the work order number. The system displays the selected work order.
Press Print/Preview in the Control Bar. The system displays the following dialog box:
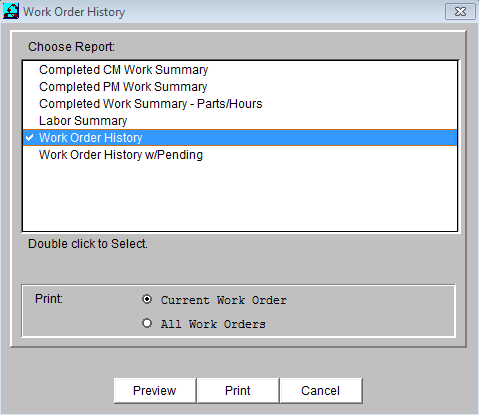
The Work Order History and the Work Order History w/Pending reports are the only available reports. The check mark preceding the report name indicates that it has been selected.
The bottom box lists your content options. Click on the appropriate radio button.
You can preview or print the report.
To preview the report, press Preview. The system displays the Preview screen that enables you to page through the report and zoom in for a closer look. When you are finished previewing the report, press OK and the system returns you to the Print/Preview screen.
Press the Print button. The system displays the standard Windows Print dialog.
Press OK to print the report. If the report is long, you can interrupt the print process by pressing Cancel.
See Chapter 7, Reports for a sample and description of the report.
PM Task Information
The PM Task Information function enables you to identify and define the different preventive maintenance tasks performed at your plant. You can use this function to print the Task List, a report that displays the information about each task. Once tasks have been defined, you can use the PM Setup function to assign them to equipment and create PM work orders.
Nested tasks
Tasks may be nested within each other, which means that a parent task may have several child tasks defined separately. For example, a semi-annual inspection may encompass all of the items listed for a monthly inspection. In this case, it would probably not be desirable to have both work orders done in the same month. So the monthly inspection could be nested within the semi-annual one. Nested tasks are used to build complex work orders quickly.
Select Equipment/PM Task Information.
If you have already accessed a task record since signing on, the system displays the most recently maintained task. If you have just signed on, the system displays the first task in the Task file. Task records are maintained in alphanumeric sequence (that is, 1-2-3...A-B-C...Z).
Required Data
To add a new task, you must enter a Description and a Category. The Task Id number is not required.
The PM Task Information Screen
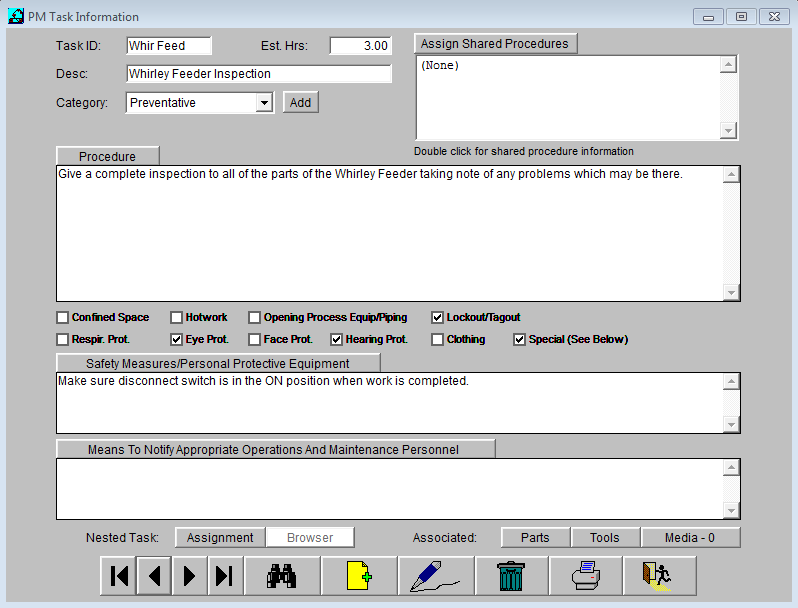
After you access the PM Task Information function, the system displays the Task Information dialog:
The following fields are displayed and may be edited here:
Task ID number.
Brief Description
Category (choose from pick list)
The Estimated Hours
Procedure. Use scroll bars to display information off the screen or press the Procedure button to make the field display fully in the window.
Safety Measures. Check appropriate box, or ‘Other’ and fill in manually.
Means taken to notify appropriate operations and maintenance personnel.
The middle portion of the screen uses multiple text boxes and toggle boxes to collect the task information.
The Nested Task Assignment button on the main PM Task Information dialog activates the Nested Task Assignment screen:
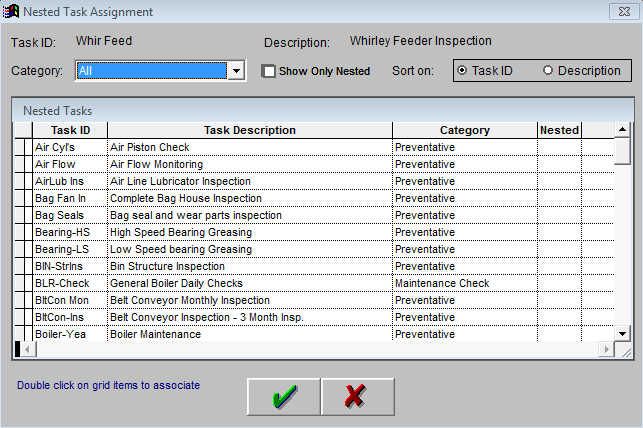
The Nested Task Assignment dialog is displayed. Double-clicking on a child task nests the task within the parent. The parent is the task you selected before you pushed the Nested Task Assignment button. The proposed child is the selected task. The Nested Task Assignment dialog lists the Task ID, Task Category and Nested status. The Task ID is a list of proposed child tasks which is the entire task list. Task Category is a general description of the task such as Electrical, Lubrication, Mechanical, and so forth (see Task Category Information). The Nested column describes whether the child task is currently nested or not.
Do not select the parent task as a child task. If you try to select this task as a child task, you will get a message stating that circular relationships are not allowed.
Double-click on a selection to nest it. The word “Yes” appears in the Nested column and the task is nested. In the example below, two tasks were selected as child tasks.

The Nested Task Browser button becomes active once nested tasks have been chosen. Pressing Nested Task Browser enables you to display the nested or parent status of your selected task. In the example above, a pump inspection was assigned two nested child tasks. Pressing the Nested Task Browser button displays the two nested tasks in the lower window. The upper window is empty because the pump inspection is not nested within another task.
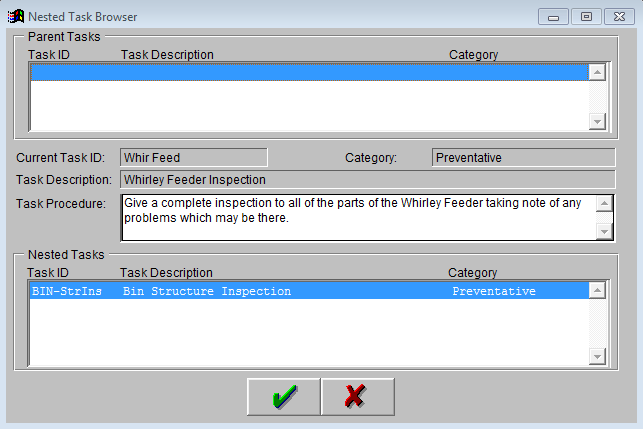
The Nested Task Browser is arraned in three sections. The top section displays the Parent to the current task (Task in the center section) if any. The bottom portion displays the Nested to the current task (Task in the center section) if any.
You can double click on a task in either the Parent or the Nested (the first or third section) to display their position one level up or one level down in the hierarchy.
Use an organizational chart method for assigning nested tasks in which children tasks only one level down in the organization are assigned to a parent. The display in the Task Browser can display only one level up or down in the hierarchy, so assign nested tasks only one level up or down on your organizational chart of tasks. Sticking to this rule makes deep multiple-layering of tasks simple, yet powerful.
To associate parts with a task, press the Parts button to display the following Parts dialog:
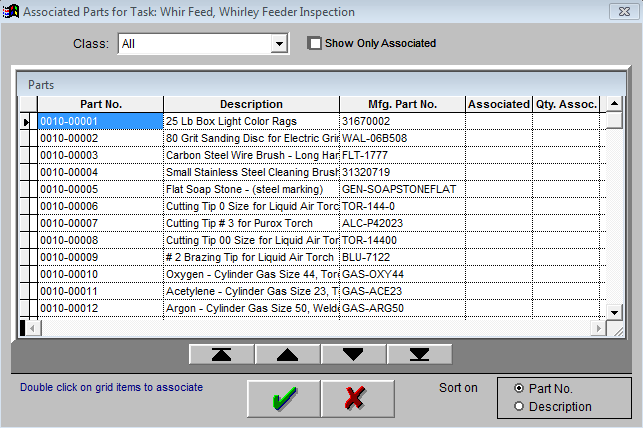
Select each part by double clicking it and indicate the quantity to be allocated. When a part is selected, the word Yes appears in the Associated column. Press Save to return to the PM Task Information dialog.
The parts will be allocated on the sooner of the due date for the PM or at its initiation (when the PM number is assigned), which could occur through printing or selecting the Start selected work orders button.
To associate tools with a task, press the Tools button to display the following Tools dialog:
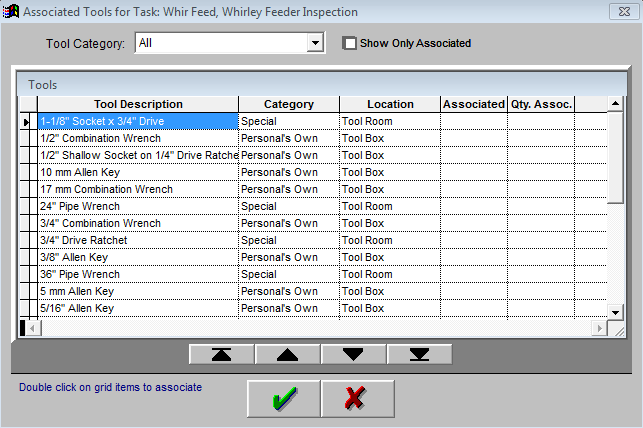
Select each tool by double clicking it and indicate the quantity to be allocated. When a tool is selected, the word Yes appears in the Associated column. Press Save to return to the PM Task Information dialog.
CATEGORY drop-down list enables you to filter the display of tasks in NESTED TASK BROWSER by category. Press the drop-down arrow for the category filter. The system displays a list of categories. Select the category of the task you plan to select. The system removes tasks of all other categories from the displayed list.
The SORT ON radio buttons displays the list in order according to either task number or description. Click on the radio button in the Order By field that identifies the sort sequence that you want to use. You can display the tasks in alphanumeric sequence based on the task ID number or the task description, whatever you are more familiar with. Currently selected tasks display a Yes in the Nested column.
Checking Show Only Nested will filter out all tasks that don’t have a Yes displayed in the Nested column.
Press OK to save changes and exit back to PM Task Information.
To print the PM Task Report, press <Print/Preview> and select print. Only the selected task will print out.
If you want to print the child tasks, access the <Task Browser>
Double-click on a child task
Press OK. The child task is now selected.
Press Print/Preview to print or preview the report
To return to the parent task, press Task Browser
Double-click on the parent document in the upper window
Repeat for each child task you want to print
Adding a New Task
Complete the following steps to add a new task:
Access the Equipment/Task Information function.
Press New on the Control Bar.
The Control Bar options change. Only Save and Cancel are now available.
The Task ID field can be used to assign a unique identification number to the task. The task ID number appears on system screens, lists, and reports. This information is recommended, but not required. If you enter a number that is already assigned to another task, the system displays the Invalid Input log when you attempt to save the record.
Enter a brief description of the task in the Desc. Field.
Click on the Category drop-down arrow and choose from the pick list.
In the Est. Hrs. field, enter the estimated number of hours that will be needed to complete the task. The Personnel/Resource Requirements function uses this information to assess the number of resources needed to complete outstanding work orders for each category of tasks.
The Procedure text box identifies the specific steps that must be taken to complete the task. Enter as much information about things to do, things not to do, things to look for, etc. that will be useful to the plant employees attempting to complete this task. Well written procedures help avoid mistakes and oversights that require additional work. Use the scroll arrows to view material that is not displayed, or pick the Procedure button to display the field fully in the window.
The Safety Measures/Personal Protective Equipment box identifies the safety measures that should be followed and the safety equipment that should be used to safely perform the task. Several common safety measures and pieces of equipment are provided above the text box. Click on the toggle boxes to select the appropriate items. Use the Special box to identify additional pieces of equipment or specific safety measures that should be used.
The Means To Notify Appropriate Operations and Maintenance Personnel text box identifies the requirements for communicating with supervisors or other maintenance personnel regarding the performance and/or completion of the task. For example, the mechanic may be required to notify the shift supervisor before starting work on the task. Like Procedure, the button can be picked to display the field fully in the window.
To add the new task, press Save in the Control Bar. To exit the screen without adding the new task, press Cancel.
If you have not entered all required information or have entered a task identification number that is already in use, the system displays the Invalid Input log.
Editing Tasks
Once a task has been added, you can re-access the record and update the information. For example, you may want to update the safety measures or procedures.
Complete the following steps to edit a task record:
Access the Equipment Task Information function.
Access the task record.
Press Find in the Control Bar to display the Task List. Then double click on the task ID number or description.
Or use file navigation arrows.
The system displays the task record.
Use your mouse or the key to access the fields and enter the new information.
Notice that the Control Bar options change after you enter a field. Only Save and Cancel are now available.
When all appropriate fields have been updated with new information, press Save in the Control Bar. To exit the task record without saving the changes, press Cancel.
Deleting Tasks
This procedure permanently removes the task record from the system.
If the task is currently assigned to any piece of equipment, the system will not delete the record. You can print the PM Task List for all equipment to identify where the task is still assigned.
Use the following steps to delete a task from the Task file:
Access the Equipment/Task Information function.
Access the task record. Press Find in the Control Bar to display the Task List. Then double click on the task number or description. The system displays the task record.
Press Delete on the Control Bar. A confirmation dialog is displayed. To continue the Delete process, press OK. To exit the Delete process and return to the task record, press Cancel.
Once you delete the task record, it cannot be retrieved.
After you press OK, the system deletes the task record, displays a small “Deleted” message box in the top right corner of the screen and displays the next record.
Printing the PM Task List
The PM Task List is a report that contains the task information entered using this function.
You can preview the PM Task List on-line or send the report to a printer. A sample of the printed report and a detailed description are provided in Chapter 7, Reports.
Use the following steps to generate and print a PM Task List:
Access the PM Task Information function.
You can focus the report on a specific task or include all tasks. To focus the report on a specific task it is necessary to first select the correct task. Press Find in the Control Bar to display the Task List and double click on the task number or description. The system displays the task record.
Press Print/Preview on the Control Bar. The system displays the following screen:
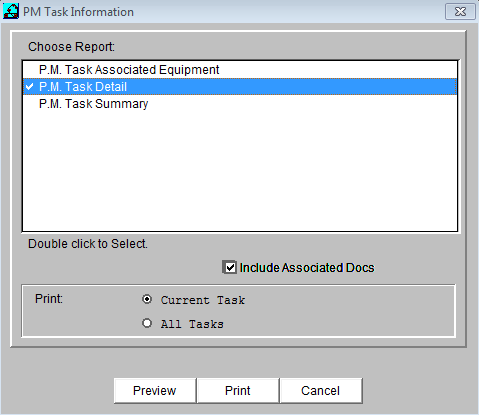
The PM Task List is the only available report. The check mark preceding the report name indicates that it has been selected.
The bottom box lists your content options.
To print the specific task, click the “Current Task” option.
To print all tasks, click the “All Tasks” option.
You can preview or print the report
To preview the report, press Preview. The system displays the Preview screen that enables you to page through the report and zoom in for a closer look. When you are finished previewing the report, press OK and the system returns you to the Print/Preview screen.
Press the Print button. The system displays the standard Windows Print dialog. Complete the Windows Print dialog information. For detailed instructions, refer to a Windows manual.
Press OK to print the report. If it is a long report, you can interrupt the print process by pressing Cancel.
Exiting the Task Information Function
Complete the following steps to exit the Task Information function and return to the Main Menu screen:
If you have entered edits to the task record, you must Save or Cancel the edits. Once you have completed the above, the Exit option on the Control Bar should be available.
Press Exit to exit the Task Information function.
Task Category Information
The Task Category Information function enables you to identify and define the different categories of work order tasks. The Personnel Resource Requirements function uses categories to determine the number of resources needed to complete each category of work orders.
You can also use this function to print the Category List, a report that displays the information about each category.
Once categories have been defined, you can use the Task Information function to assign them to PM tasks and the CM Work Orders function to assign them to CM work orders.
Select Equipment/Category Information.
If you have already accessed a category record since signing on, the system displays the most recently maintained category. If you have just signed on, the system displays the first category in the Category file.
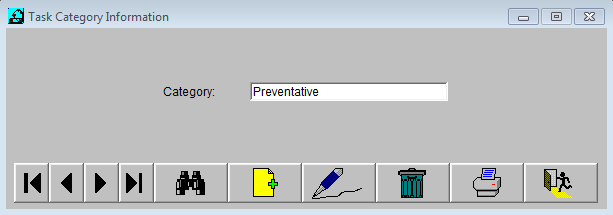
Adding a New Category
Complete the following steps to add a new category:
Access the Category Information function.
Press New on the Control Bar. Notice that the Control Bar options change. Only Save and Cancel are now available.
Enter the category name.
Press Save in the Control Bar. To exit the screen without adding the new category, press Cancel.
Editing Categories
Once a category has been added, you can re-access the record and update the name.
Complete the following steps to edit a category record:
Access the Category Information function.
Access the category record. Press Find in the Control Bar to display the Category List. Then double click on the category title. The system displays the category record.
Use your mouse or the key to access the field and enter the new name.
Notice that the Control Bar options change after you enter the field. Only Save and Cancel are now available.
To save the new name, press Save in the Control Bar. To exit the category record without saving the changes, press Cancel.
Deleting Categories
This procedure permanently removes the category record from the system.
If the category is currently assigned to any task or work order, the system will not delete the record.
Use the following steps to delete a category from the Category file:
Access the Category Information function.
Access the category record. Press Find in the Control Bar to display the Category List. Then double click on the category name. The system displays the category record.
Press Delete on the Control Bar. A confirmation dialog is displayed.
To confirm delete, press OK. To cancel the Delete process and return to the category record, press Cancel.
Once you delete the category record, it cannot be retrieved.
A small “Deleted” message box appears in the top right corner of the screen and the next record is displayed.
Printing the Category List
The Category List is a report that contains the category information entered using this function. You can preview the Category List on-line or send the report to a printer.
Use the following steps to generate and print a Category List:
Access the Category Information function.
You can focus the report on a specific category or include all categories. To focus the report on a specific category you will need to select the record
Press Find in the Control Bar to display the Category List and double click on the category. The system displays the category record.
Press Print/Preview on the Control Bar. The system displays the following screen:
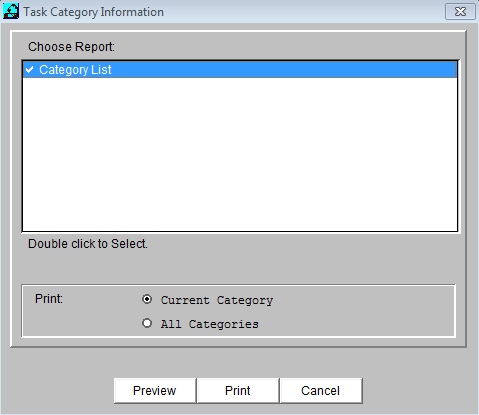
The Category List is the only available report. The check mark preceding the report name indicates that it has been selected. The bottom box lists your content options. Click on the appropriate radio button.
To print only the record, select the Current Category option.
To print all records, select All Categories.
You can preview or print the report. To preview the report, press Preview. The system displays the Preview screen that enables you to page through the report and zoom in for a closer look. When you are finished previewing the report, press OK and the system returns you to the Print/Preview screen.
Press the Print button. The system displays the standard Windows Print dialog.
Press OK to print the report.
Exiting the Category Information Function
Complete the following steps to exit the Category Information function and return to the Main Menu screen:
If you have entered edits to the category record, you must Save or Cancel the edits.
Once you have completed the above, the Exit option on the Control Bar should be available. Press Exit to exit the Category Information function.
Facility Shutdown Information
The Facility Shutdown Information function enables you to identify and define the different periods of time when sets of equipment or areas of your facility are scheduled to be shut down.
You can also use this function to print the Shutdown List, a report that displays the information about each shutdown.
Once shutdowns have been defined, you can use the PM Setup function to schedule assigned preventive maintenance tasks for the shutdown periods.
Select Equipment/Facility Shutdown Information.
If you have already accessed a shutdown record since signing on, the system displays the most recently maintained shutdown. If you have just signed on, the system displays the first shutdown in the Shutdown file.
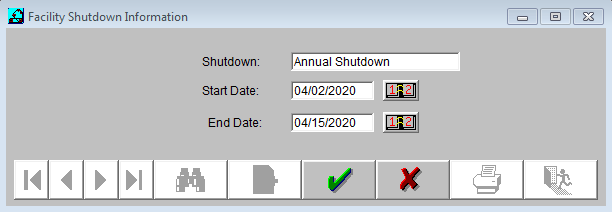
To add a new shutdown, you must enter a Shutdown description, a Start Date and an End Date.
Adding a New Shutdown
Access the Facility Shutdown Information function.
Press New on the Control Bar. Notice that the Control Bar options change. Only Save and Cancel are now available.
Enter a name or brief description of the shutdown in the Shutdown information.
Identify the start and end dates for the shutdown period. You can type the dates using the MMDDYYYY format or click on the date book icons to select dates from displayed calendars.
To add the new shutdown, press Save in the Control Bar. Or to exit the screen without adding the new shutdown, press Cancel.
If you have not completed all fields, the system displays the Invalid Input Log. See Chapter 1 for more information.
Editing Shutdowns
Once a shutdown has been added, you can re-access the record and update the information. For example, you may want to change the start or end date.
Complete the following steps to edit a shutdown record:
Access the Facility Shutdown Information function.
Access the shutdown record. Press Find in the Control Bar to display the Shutdown List. Then double click on the shutdown to be edited. The system displays the shutdown record.
Use your mouse or the key to access the fields and enter the new information. Notice that the Control Bar options change after you enter a field. Only Save and Cancel are now available.
When all appropriate fields have been updated with new information, press Save in the Control Bar. To exit the shutdown record without saving the changes, press Cancel.
Deleting Shutdowns
This procedure permanently removes the shutdown record from the system.
If the shutdown is currently assigned to an assigned PM task or PM work order, the system will not delete the record.
Use the following steps to delete a shutdown from the Shutdown file:
Access the Shutdown Information function.
Access the shutdown record. Press Find in the Control Bar to display the Shutdown List. Then double click on the shutdown. The system displays the shutdown record.
Press Delete on the Control Bar. A confirmation dialog is displayed. To continue the Delete process, press OK. To exit the Delete process and return to the shutdown record, press Cancel.
Once you delete the shutdown record, it cannot be retrieved.
After you press OK, the system deletes the shutdown record, displays a small “Deleted” message box in the top right corner of the screen and displays the next record.
Printing the Shutdown List
The Shutdown List is a report that contains the shutdown information entered using this function. You can preview the Shutdown List on-line or send the report to a printer.
Use the following steps to generate and print a Shutdown List:
Access the Facility Shutdown Information function.
You can focus the report on a specific shutdown or include all shutdowns. To focus the report on a specific shutdown, press Find in the Control Bar to display the Shutdown List and double click on the shutdown. The system displays the shutdown record.
Press Print/Preview on the Control Bar. The system displays the following screen:
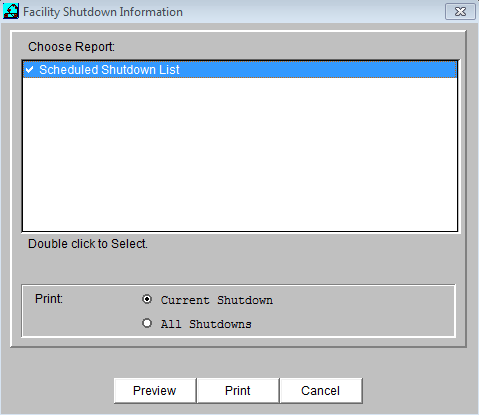
The Shutdown List is the only available report. The check mark preceding the report name indicates that it has been selected.
The bottom box lists your content options. Click on the appropriate radio button.
You can preview or print the report. To preview the report, press Preview. The system displays the Preview screen that enables you to page through the report and zoom in for a closer look. When you are finished previewing the report, press OK and the system returns you to the Print/Preview screen.
Press the Print button. The system displays the standard Windows Print dialog. Complete the Windows Print dialog information.
Press OK to print the report. The system begins generating the report and displays a message box that shows the number of each page as it is spooled to the printer. You can interrupt the print process by pressing Cancel.
Exiting the Shutdown Information Function
Complete the following steps to exit the Shutdown Information function and return to the Main Menu screen:
If you have entered a field in the shutdown record, you must exit the field.
If you have entered edits to the shutdown record, you must Save or Cancel the edits.
Once you have completed the above, the Exit option on the Control Bar should be available.
Press Exit to exit the Shutdown Information function.
A Message to All Mechanic's Mate Users
My name is Thurston Clark, and I am the original and sole programmer of the Mechanic's Mate CMMS. I wrote every line of code, starting in the 1990s with FoxPro 2.6 and migrating it through to its current version in FoxPro 9.
To ensure the continuity of the software, I am available for expert support, data recovery, and custom modifications. You can read the full development case study for Mechanic's Mate on my professional portfolio site to learn more about my background.
If you are a current user needing assistance or a new customer with questions, please do not hesitate to reach out. You will be speaking directly with the programmer who wrote every line of its code.
Ready to take control of your maintenance operations and own your data?
Explore the Mechanic's Mate CMMS Product Page.
For support or inquiries, please Contact Me Here.